Playwright Locators and Assertions: Day 2 Tutorial
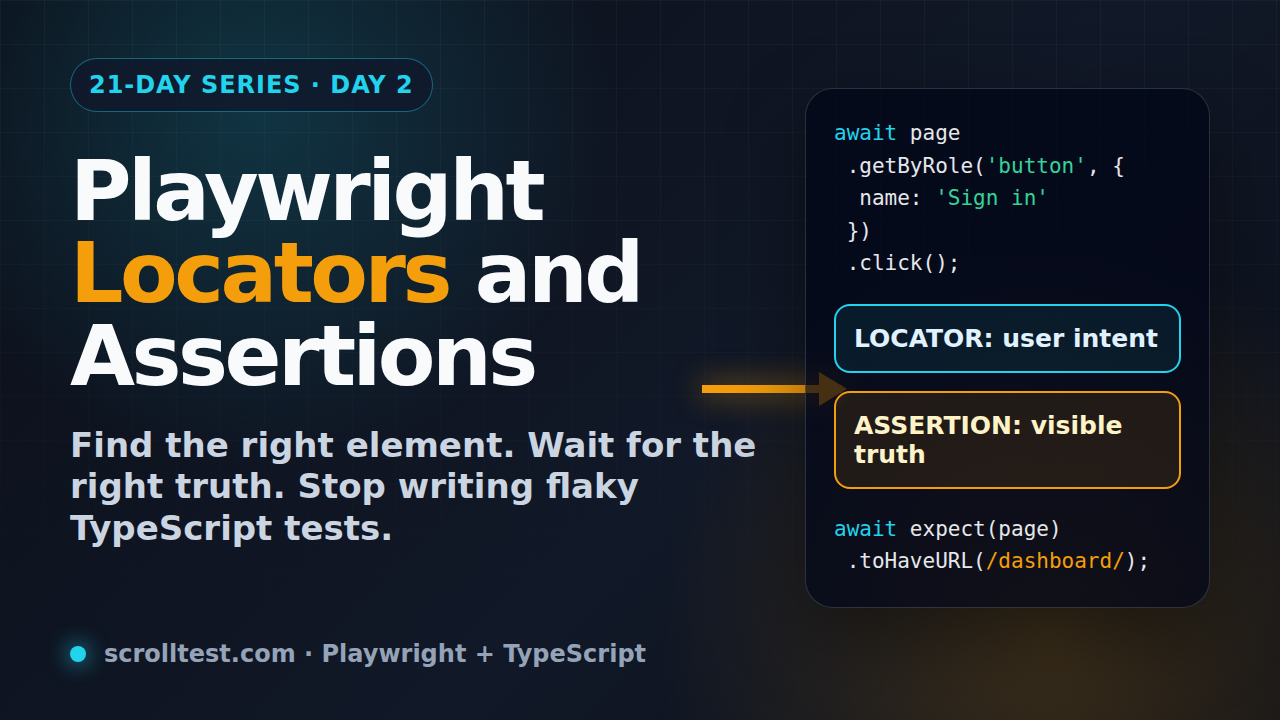
Playwright locators and assertions tutorial, Day 2 of the 21-Day Playwright + TypeScript Tutorial Series.
🎭 Want to master this with real projects? Join the Playwright Automation Mastery course at The Testing Academy.
Playwright locators and assertions decide whether your tests become stable assets or noisy CI alarms. On Day 1, we created a clean Playwright TypeScript setup. Today I want to make that setup useful by teaching the two habits that remove most beginner flakiness: finding the right element and waiting for the right truth.
If you are coming from Selenium, Cypress, or manual testing, this lesson matters more than another folder structure debate. A Playwright test usually fails for one of three reasons: the locator points to the wrong element, the assertion checks too early, or the test couples itself to CSS that changes every sprint.
Table of Contents
- Why Playwright Locators and Assertions Matter
- The Mental Model: Locator First, Assertion Second
- Project Prep for Day 2
- A Practical Locator Strategy for Real Teams
- Playwright Assertions That Wait Correctly
- Hands-On: Build a Stable Login Test
- Screenshot Descriptions and Debugging Flow
- Common Pitfalls I See in Teams
- Day 2 Homework
- FAQ
Contents
Why Playwright Locators and Assertions Matter
The official Playwright documentation describes locators as the central way to find elements on a page. It also states that every time a locator is used for an action, Playwright resolves an up-to-date DOM element. That single design choice is why Playwright locators feel different from old element handles.
In a modern React, Angular, Vue, or Next.js app, the DOM can re-render between the time your test finds an element and the time it clicks it. If your framework stores a stale element reference, you get random failures. If your test asks Playwright to locate the element at the moment of action, you get a better chance of matching what a real user sees.
That does not mean Playwright magically fixes bad test design. It means you should write tests that cooperate with Playwright instead of fighting it. Good Playwright locators and assertions are user-facing, strict, readable, and tied to business intent.
What the current ecosystem tells us
I checked current public signals before writing this lesson. The Microsoft Playwright GitHub repository shows more than 90,000 stars, and the npm download API reports roughly 158 million downloads for @playwright/test in the last month. The latest npm package I checked is @playwright/test 1.60.0.
Those numbers do not prove quality by themselves, but they do prove adoption. When a tool reaches that scale, your test code style has to be maintainable for teams, not just one local machine. Locators and assertions are the first place that maintainability shows up.
Why Day 2 is not optional
Most beginner Playwright tutorials rush to Page Object Models, CI pipelines, and Docker before the learner can write a reliable locator. I see the damage later: test suites full of .nth(2), brittle CSS selectors, fixed timeouts, and assertions that pass even when the user flow is broken.
For a QA engineer in India moving from manual testing to automation, this is also an interview topic. Product companies and strong service teams do not only ask, “Can you write a Playwright script?” They ask why one selector is better than another, how auto-waiting works, and how you debug flaky assertions in CI.
The Mental Model: Locator First, Assertion Second
Here is the mental model I use with new SDETs: a locator is a promise to find a user-visible thing, and an assertion is a promise to verify a user-visible truth. The test becomes stable when both promises match the product behavior.
Do not think of a locator as “some string that points to HTML.” Think of it as a contract between product, accessibility, and automation. A good locator should still make sense when a developer changes a div, adds a wrapper, or refactors the CSS module name.
The Playwright locator chain
A locator does not immediately grab the element and freeze it in memory. It describes how Playwright should find the element when you perform an action or assertion. That is why this style is preferred:
const emailInput = page.getByLabel('Email');
await emailInput.fill('qa@example.com');
await expect(emailInput).toHaveValue('qa@example.com');
The variable is not a stale DOM element. It is a locator definition. When fill runs, Playwright finds the current matching element. When toHaveValue runs, Playwright checks the current matching element again.
Assertions should describe outcomes, not implementation
Beginner tests often assert implementation details:
await expect(page.locator('.toast.success')).toBeVisible();That might work today, but it tells me nothing about the user promise. A better assertion checks the thing the user understands:
await expect(page.getByText('Profile updated successfully')).toBeVisible();The first version depends on class names. The second version depends on visible product copy. If the product copy changes, the test should probably change too because the user experience changed.
Project Prep for Day 2
Continue from the Day 1 setup. If you missed it, read Playwright TypeScript Setup: Day 1 Tutorial first. You should already have Node, TypeScript, Playwright browsers, and a working playwright.config.ts.
Run these commands from your project root:
npm install
npx playwright test --version
npx playwright test --list
If those commands fail, do not continue. Fix the setup first. Automation learning becomes frustrating when the base project is already broken.
Use a safe demo target
For practice, use your own demo app, a local training page, or Playwright’s public examples. Do not test a real banking, HR, or ecommerce production site without permission. For this tutorial, I will use generic examples that map to a login flow, a dashboard, and a settings form.
Create a new spec file:
mkdir -p tests/day-02
code tests/day-02/locators-and-assertions.spec.ts
Start with strict TypeScript imports
Every test in this lesson uses the Playwright test runner:
import { test, expect } from '@playwright/test';Keep imports small. If you need helpers later, add them later. Day 2 is about writing tests you can understand without opening five files.
A Practical Locator Strategy for Real Teams
Playwright offers many locator methods. The question is not “Which one exists?” The question is “Which one should my team prefer?”
Here is the order I recommend for most product teams:
- Use role-based locators for buttons, links, headings, checkboxes, tabs, and dialogs.
- Use labels for form fields.
- Use placeholder text only when the placeholder is stable and meaningful.
- Use visible text for user-facing messages and navigation items.
- Use test IDs for elements that have no stable user-facing label.
- Use CSS selectors only as a last resort.
This order aligns with Playwright’s own guidance around user-facing attributes and resilient locators. It also pushes teams toward accessible UI. If a button has no name that a screen reader or test can understand, that is not only a test problem.
Role locators: your default for clickable UI
Role locators find elements by accessible role and name. The official docs note that role locators follow W3C ARIA role and accessible name behavior. In plain English, this means the locator is close to how users and assistive tools understand the page.
await page.getByRole('button', { name: 'Sign in' }).click();
await page.getByRole('link', { name: 'Forgot password?' }).click();
await expect(page.getByRole('heading', { name: 'Dashboard' })).toBeVisible();
I like role locators because they expose UI quality issues early. If a developer ships three buttons all named “Submit,” the test becomes hard to write because the product is hard to understand.
Label locators: best friend of forms
Form tests become clean when labels are wired correctly:
await page.getByLabel('Email').fill('qa@example.com');
await page.getByLabel('Password').fill('Secret123!');
await page.getByRole('button', { name: 'Sign in' }).click();
If getByLabel does not work, check whether the HTML label is connected to the input. This is a useful bug to raise. Your automation is telling you that the form may not be accessible enough.
Test IDs: powerful, but not the first choice
Playwright supports getByTestId(). The docs say testing by test IDs can be resilient when text or role changes. I agree, with one condition: test IDs should be a product-team convention, not a secret QA workaround.
await page.getByTestId('checkout-total').click();
await expect(page.getByTestId('order-status')).toHaveText('Confirmed');
Use test IDs for dynamic components, icon-only buttons, virtualized lists, canvas-heavy widgets, and places where the user-facing text is intentionally variable. Do not use them to hide poor accessibility.
Filtering and scoping
Real pages have repeated cards, rows, and buttons. Instead of using nth() immediately, scope the locator to the section that matters:
const userRow = page.getByRole('row', { name: /pramod@example.com/i });
await userRow.getByRole('button', { name: 'Edit' }).click();
This reads like a manual test step: find the row for this user, then click Edit inside that row. It is readable and less fragile than “click the third Edit button.”
Playwright Assertions That Wait Correctly
Playwright assertions are not plain synchronous checks. Web-first assertions such as toBeVisible(), toHaveText(), and toHaveURL() retry until the condition passes or the timeout expires. This is one of the biggest differences between stable Playwright tests and old sleep-heavy scripts.
The official assertion docs show that Playwright can re-fetch an element and check it repeatedly until the expected condition is met. That is why this is better:
await expect(page.getByText('Order submitted')).toBeVisible();than this:
await page.waitForTimeout(3000);
await expect(page.getByText('Order submitted')).toBeVisible();
The first version waits only as long as needed. The second version always wastes three seconds and still fails if the system takes four seconds.
Useful assertions for Day 2
Keep this shortlist near your editor:
toBeVisible()for user-visible elements.toBeHidden()for loaders, dialogs, and removed messages.toHaveText()for exact or partial text checks.toContainText()for lists, cards, and messages with extra content.toHaveURL()for navigation outcomes.toHaveValue()for form inputs.toBeEnabled()andtoBeDisabled()for button states.toHaveCount()for table rows, search results, and repeated components.
Assertion timeout control
You can set a project-level expectation timeout in playwright.config.ts:
import { defineConfig } from '@playwright/test';

export default defineConfig({
  timeout: 30_000,
  expect: {
    timeout: 7_000,
  },
  use: {
    trace: 'on-first-retry',
    screenshot: 'only-on-failure',
  },
});
I usually start with five to seven seconds for assertions in UI suites. If a normal assertion needs thirty seconds, investigate the product flow, network calls, or test data. Do not hide a slow app behind a huge timeout.
🚀 Level Up Your Playwright
From locators to CI pipelines — build a production-grade Playwright + TypeScript framework step by step.
Hands-On: Build a Stable Login Test
Let’s build one focused test. The goal is not to automate the entire app. The goal is to practice locators and assertions that survive normal UI changes.
Step 1: Write the happy path
import { test, expect } from '@playwright/test';

test.describe('Day 2: locators and assertions', () => {
  test('user can sign in and see dashboard', async ({ page }) => {
    await page.goto('/login');

    await expect(page.getByRole('heading', { name: 'Sign in' })).toBeVisible();

    await page.getByLabel('Email').fill('qa@example.com');
    await page.getByLabel('Password').fill('Secret123!');
    await page.getByRole('button', { name: 'Sign in' }).click();

    await expect(page).toHaveURL(/.*dashboard/);
    await expect(page.getByRole('heading', { name: 'Dashboard' })).toBeVisible();
    await expect(page.getByText('Welcome back')).toBeVisible();
  });
});
Notice what is missing: no fixed wait, no CSS class, no XPath, no random index. The test reads like a user journey.
Step 2: Add a negative assertion
Good test suites check failure states too. Add a test for invalid credentials:
test('shows a clear error for invalid credentials', async ({ page }) => {
  await page.goto('/login');

  await page.getByLabel('Email').fill('wrong@example.com');
  await page.getByLabel('Password').fill('bad-password');
  await page.getByRole('button', { name: 'Sign in' }).click();

  await expect(page.getByRole('alert')).toContainText('Invalid email or password');
  await expect(page).toHaveURL(/.*login/);
});
If the page does not expose the error as an alert, ask the frontend team whether it should. This is how automation improves product quality instead of only checking boxes.
Step 3: Handle repeated elements
Now imagine the dashboard has project cards. Each card has a Settings button. Avoid this:
await page.getByRole('button', { name: 'Settings' }).nth(1).click();Prefer this:
const apiProjectCard = page
  .getByRole('article')
  .filter({ hasText: 'API Automation Project' });

await apiProjectCard.getByRole('button', { name: 'Settings' }).click();
await expect(page.getByRole('heading', { name: 'Project Settings' })).toBeVisible();
The second version carries meaning. Six months later, a new SDET can understand which Settings button we intend to click.
Screenshot Descriptions and Debugging Flow
Because this is a written tutorial, here are the screenshots I would capture while teaching this in a classroom or YouTube lesson.
Screenshot 1: Locator picker in Playwright Inspector
Description: The browser is open in headed mode with Playwright Inspector beside it. The locator picker highlights the Sign in button. The generated locator shows getByRole('button', { name: 'Sign in' }). This screenshot teaches learners that Playwright can suggest user-facing locators instead of brittle CSS.
Screenshot 2: HTML report with a failed assertion
Description: The HTML report shows one failed test. The error points to await expect(page.getByRole('alert')).toContainText(...). The call log shows Playwright retrying the assertion before timing out. This screenshot helps learners see that Playwright assertions wait automatically.
Screenshot 3: Trace Viewer action timeline
Description: Trace Viewer displays actions in the left timeline: goto, fill, click, and assertion. The center panel shows the page snapshot at the failure point. This is the fastest way to debug “works locally, fails in CI” reports.
If you want a stronger debugging workflow, read Cost of Flaky Tests: Engineering Time and CI Waste. Locator mistakes are one of the cheapest flakiness causes to fix early.
Common Pitfalls I See in Teams
These mistakes show up again and again when teams move to Playwright.
Pitfall 1: Using CSS because it feels familiar
CSS selectors are not evil. They are just too easy to misuse. A selector like .btn.primary.large describes styling, not behavior. The day a designer changes the button class, your test fails even though the user flow still works.
Use CSS when you truly need structure-level targeting. Prefer roles, labels, text, and test IDs for product behavior.
Pitfall 2: Replacing every wait with a longer timeout
A timeout is not a strategy. If a test fails because data is missing, a longer timeout only delays the failure. Use web-first assertions, network-aware test data, and clear page states.
// Bad
await page.waitForTimeout(5000);

// Better
await expect(page.getByText('Payment received')).toBeVisible();
Pitfall 3: Overusing nth()
nth() is sometimes necessary, but it should make you uncomfortable. If you cannot explain why the second item is the correct item, your test is fragile. Scope by row, card, section, or accessible name first.
Pitfall 4: Asserting too little
A test that clicks five buttons and checks nothing meaningful is not an automated test. It is a script. Every important action should lead to a visible assertion: URL changed, heading appeared, status updated, button disabled, row count changed, or message displayed.
Pitfall 5: Ignoring accessibility bugs
When getByRole and getByLabel are painful to use, many testers silently switch to CSS. I prefer raising the issue. Better labels and roles help users, screen readers, and automation together.
This connects directly to self-healing discussions. If your selectors are meaningful from the start, you need less magic later. For a broader view, read Self-Healing Selectors in 2026: Production Reality.
Day 2 Homework
Do this before moving to Day 3. You will learn more by fixing three bad selectors than by watching another hour of video.
- Create a new spec file named
tests/day-02/homework.spec.ts. - Automate one login or search flow in a demo app.
- Use at least one role locator, one label locator, and one text assertion.
- Remove every
waitForTimeoutfrom the test. - Run the test in headed mode and then open the HTML report.
Use these commands:
npx playwright test tests/day-02 --headed
npx playwright show-report
If the test fails, do not panic. Open the trace or report, check which locator failed, and ask one question: “What would a user call this thing?” The answer usually points to a better locator.
Day 2 checklist
- I can explain why role locators are usually better than CSS selectors.
- I can use
getByLabelfor form fields. - I can use
getByTestIdwithout abusing it. - I can write assertions that wait automatically.
- I can debug a failed locator in the HTML report or Trace Viewer.
FAQ
Are Playwright locators better than XPath?
For most web app tests, yes. XPath can target almost anything, but that power often leads to brittle tests. Playwright locators such as getByRole, getByLabel, and getByText are closer to user behavior and easier to read in code reviews.
Should I always use test IDs?
No. Use test IDs when user-facing locators are unstable or unavailable. For buttons, links, headings, and inputs, start with roles and labels. Test IDs are excellent for complex widgets, repeated components, and values that change based on user data.
Why does Playwright say strict mode violation?
Playwright expects many locators used for actions to resolve to one element. A strict mode violation means your locator matched multiple elements. Fix it by adding a role name, scoping inside a card or row, using filter(), or adding a stable test ID.
Can I use CSS selectors in Playwright?
Yes, but treat them as a fallback. CSS is useful for technical structure, but it often couples tests to implementation details. If a role, label, text, or test ID can express the user intent, choose that first.
Key Takeaways: Playwright Locators and Assertions
Playwright locators and assertions are the foundation of stable TypeScript automation. If you get this right on Day 2, every future topic in this series becomes easier: Page Objects, fixtures, API setup, CI, visual testing, and AI-assisted test generation.
- Prefer role, label, text, and test ID locators before CSS or XPath.
- Use assertions that describe visible user outcomes.
- Let Playwright auto-wait through web-first assertions instead of adding fixed sleeps.
- Scope repeated elements by row, card, or section instead of jumping to
nth(). - Raise accessibility issues when good locators are hard to write.
Tomorrow, we move from single tests to clean test structure: test.describe, hooks, annotations, and how to keep specs readable without building a framework too early.
Sources: Playwright locators documentation, Playwright assertions documentation, Playwright auto-waiting documentation, Microsoft Playwright GitHub repository, @playwright/test npm package.
🎓 Master Playwright End to End
Join hundreds of SDETs building real automation frameworks. Lifetime access, hands-on projects, and a job-ready portfolio.