
Step by Step Mobile App Testing with Appium in Python

🎭 Want to master this with real projects? Join the Playwright Automation Mastery course at The Testing Academy.
In this series of blogs, I will discuss about the appium (test automation framework for mobile apps). We will discuss how you can automate your android mobile apps and save your testing hours. I will cover appium with python client and for android only.Contents
What is Appium?
Appium is an open source test automation framework that can be used to test native, hybrid and mobile web apps. It uses Web-Driver protocol to test iOS and Android apps. This is how Appium works…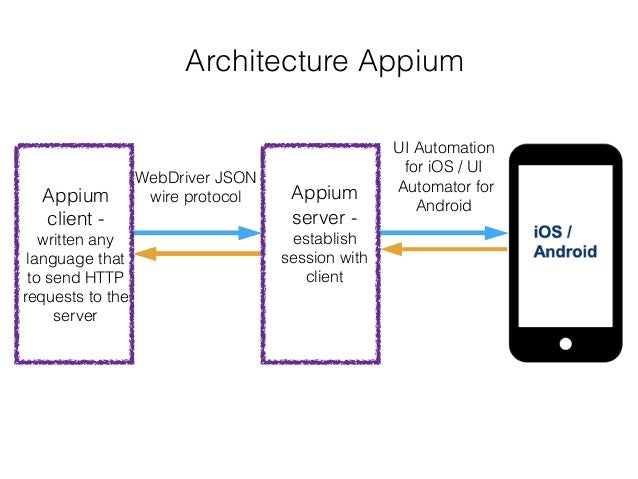
🚀 Level Up Your Playwright
From locators to CI pipelines — build a production-grade Playwright + TypeScript framework step by step.
Downloads:
- Appium.exe
- Android SDK API >= 17
- Java JDK v1.8
- Apache Ant
- PyCharm (IDE for Python)
Pre-requisites:
- Of course basics of Python.
- You must have following environment variables set on your windows machine.
- JAVA_HOME – C:\Program FilesJavajdk1.8.0_25
- ANDROID_HOME – D:\Android_Developmentandroid_sdk
- ANT_HOME – C:apache-ant-1.9.4
- PATH – C:\WindowsSystem32;D:Android_Developmentandroid_sdkplatform- tools;%JAVA_HOME%bin;D:Android_Developmentandroid_sdktools;%ANT_HOME%bin;
- Android device with USB Debugging is ‘ON’.
- Python Appium Client – You can install it using pip using below mentioned command in ‘CMD'[code] pip install Appium-Python-Client [/code]
Configuring Appium and inspect our Demo App for resources
Step 1: From source code extract the files and put the ‘MyApplication.apk’ file somewhere in one folder. (Note : You can use your own APK) [quads id=”2″] Step 2: Run Appium.exe and go to first tab(Android icon) and browse the file , Appium will automaticaly pull the package info, Launch Activity etc. details Step3: Start the Appium server by Clicking the Play icon and Click on the “Search icon” button to inspect the resource for path,id,name etc. As you can see I have a resource ID of the refresh button of my Demo App. Copy that ID we need it for future. Step 4: It will install the APK to the device and Now you can see the Appium inspector to see the Resource IDs and other information in details tab. Step 5 : If you click on the “android.widget.ImageButton[384,755][480,854]” . In the details section you can see its resource ID: “com.witmergers.getstatus:id/fab” . Step 6: Now open Pycharm and write code in python to open the Application and Click on the Image Button(Refresh Button).__author__ = 'WP8Dev'
import os
import unittest
from appium import webdriver
''' ScrollTest.com by Promode '''
''' This Test Case Just Click on the Refresh Button My Application '''
''' Just Click and Verify it in you Phone '''
''' Copyright 2015 '''
class ContactAppTestAppium(unittest.TestCase):
def setUp(self):
desired_caps = {}
desired_caps['platformName'] = 'Android'
desired_caps['platformVersion'] = '4.4'
desired_caps['deviceName'] = 'A102'
desired_caps['app'] = 'C:PyEditorAppium_ScrollTestsrcWitStatus.apk'
desired_caps['appPackage'] = 'com.witmergers.getstatus'
desired_caps['appActivity'] = '.MainActivity'
self.driver = webdriver.Remote('http://127.0.0.1:4723/wd/hub', desired_caps)
def test_ClickRefreshLink(self):
refreshButton = self.driver.find_element_by_id("com.witmergers.getstatus:id/fab")
self.assertTrue(refreshButton.is_displayed())
refreshButton.click()
## Right now we are just verify the displayed message on the Phone
## You can right code to handle that toast message and Verify that message
def tearDown(self):
self.driver.quit()
if __name__ == '__main__':
suite = unittest.TestLoader().loadTestsFromTestCase(ContactAppTestAppium)
unittest.TextTestRunner(verbosity=2).run(suite)Source code on GitHub[/sociallocker] Now start developing more Test cases and keep testing Apps.
🎓 Master Playwright End to End
Join hundreds of SDETs building real automation frameworks. Lifetime access, hands-on projects, and a job-ready portfolio.


It worked !! Thank you 🙂
Good!!
Can you please give me an idea about how much API support is available if Appium-python is used in comparison to Appium-Java ?
API support is nearly similar but Appium java has more support and documentation available.
Thanks for the Step by Step Tutorial, Helps a Lot
Glad you liked it. 😃
Can you make a tutorial for iOS device? Thanks for the tutorial!
Hello bro.
i am totally fedup. for the last 24 hours continuing try to make a .py into .apk through virtual box, ubuntu, python, linux, android.
but cant possible
could you please help me