How to Build a QA Agent From Scratch: Jira to LangChain to Playwright to CI/CD
Contents
The LinkedIn Post That Made 221 Engineers Rethink QA Automation
Libin Sebastian, a Program Delivery Manager at TCS, posted something on LinkedIn last month that triggered 221 reactions and 35 reposts. The post was about a fundamental shift: “We’re entering a phase where AI is no longer just supporting testing, but actively driving it. From understanding requirements and analyzing Jira tickets to generating test cases, executing them through tools like Playwright, and integrating with CI/CD — AI agents are slowly becoming end-to-end QA systems.”
🤖 Learning AI-powered testing? Go hands-on with LLM, RAG, and AI-agent testing in the AI-Powered Testing Mastery course at The Testing Academy.
What struck me about the reactions wasn’t excitement — it was anxiety. Senior SDETs asking “so what do we do now?” Test leads wondering “do I build this or buy this?” This article answers all three questions with a complete architecture breakdown and working code.
What Is a QA Agent (And What It Is Not)
An AI QA agent is an autonomous or semi-autonomous system that can analyze requirements, generate test cases, execute tests, interpret results, and take follow-up actions — without human intervention at every step. This is fundamentally different from AI-assisted testing tools that suggest test cases for a human to review and run.
The distinction matters. An AI-assisted tool is like a GPS that gives you directions — you still drive. An AI agent is like an autonomous vehicle — it navigates, drives, and handles obstacles, with you monitoring from the passenger seat and intervening when necessary.
A QA agent is NOT a replacement for QA engineers. It is a system that handles the repetitive, structured parts of testing so that human testers can focus on judgment — exploratory testing, usability assessment, risk analysis, edge case identification.
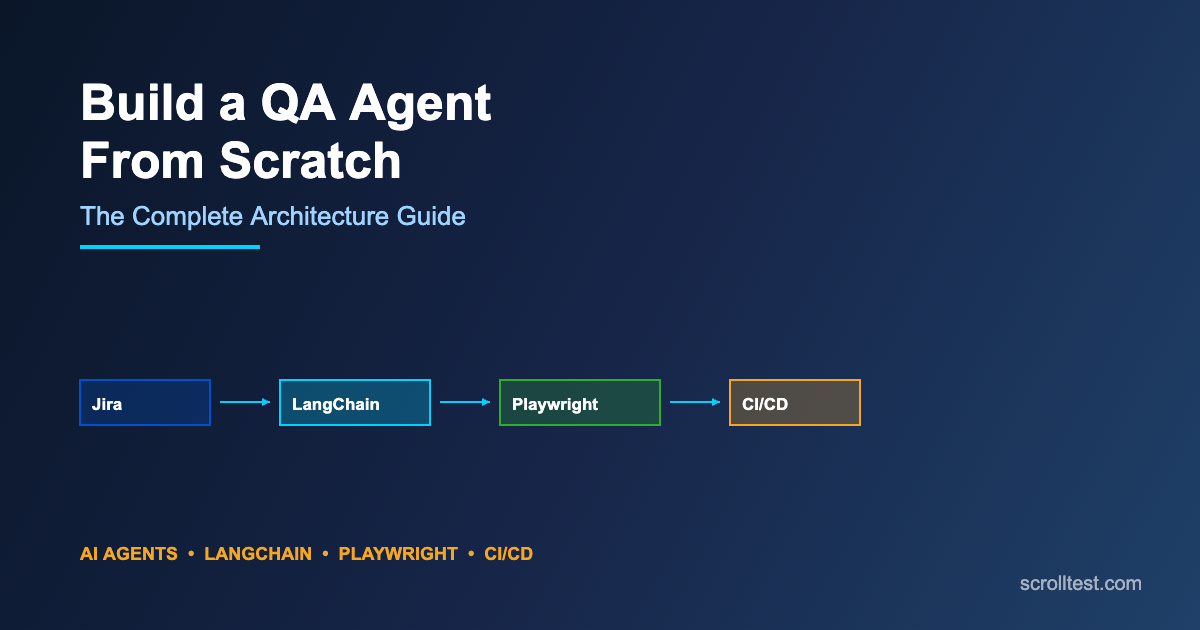
The Complete Architecture: Six Layers From Jira to CI/CD
A production-ready QA agent architecture has six layers. Each layer has a specific responsibility, and the data flows through them sequentially — though in practice, there are feedback loops between layers.
Layer 1: The Input Layer (Requirement Ingestion)
The agent needs to understand what to test. This layer connects to your project management system — Jira, Linear, Azure DevOps, or GitHub Issues — and extracts requirement information from tickets. It parses user stories, acceptance criteria, technical specifications, and linked documentation.
// Example: Jira ticket ingestion via REST API
async function ingestJiraTicket(ticketId) {
  const response = await fetch(
    `https://your-domain.atlassian.net/rest/api/3/issue/${ticketId}`,
    { headers: { 'Authorization': `Basic ${btoa(email + ':' + apiToken)}` } }
  );
  const ticket = await response.json();

  return {
    summary: ticket.fields.summary,
    description: ticket.fields.description,
    acceptanceCriteria: extractAC(ticket.fields.description),
    components: ticket.fields.components.map(c => c.name),
    priority: ticket.fields.priority.name,
    linkedIssues: ticket.fields.issuelinks,
    attachments: ticket.fields.attachment
  };
}
The critical challenge at this layer is context extraction. Jira tickets are written by humans for humans — they contain ambiguity, implicit assumptions, and references to tribal knowledge. The agent needs careful prompting to ask clarifying questions rather than making assumptions.
Layer 2: The Intelligence Layer (LLM Processing)
This is the brain of the agent. An LLM (Claude, GPT-4, Llama, or a fine-tuned model) processes the ingested requirements and generates structured test plans. The LLM is orchestrated through a framework like LangChain or a custom orchestration layer.
// LangChain-based test generation chain
import { ChatAnthropic } from "@langchain/anthropic";
import { PromptTemplate } from "@langchain/core/prompts";

const testGenPrompt = PromptTemplate.fromTemplate(`
You are a senior SDET analyzing a Jira ticket to generate test cases.

Ticket Summary: {summary}
Acceptance Criteria: {acceptanceCriteria}
Component: {component}
Existing Test Patterns: {existingPatterns}

Generate test cases in the following JSON format:
- testId: unique identifier
- title: descriptive test name
- type: "functional" | "boundary" | "negative" | "integration"
- priority: "P0" | "P1" | "P2"
- steps: array of test steps with expected results
- testData: required test data with generation instructions
- automationHint: suggested Playwright selectors or API endpoints
`);

const chain = testGenPrompt.pipe(
  new ChatAnthropic({ model: "claude-sonnet-4-20250514" })
);
The key to making this layer work is grounding. The LLM must be grounded in your application’s actual architecture, your existing test patterns, and your team’s testing standards. Without grounding, you get generic test cases that don’t map to your codebase. Retrieval-Augmented Generation (RAG) solves this — you build a vector store of your existing test code, API docs, and UI component library.
Layer 3: The Tool Layer (MCP Server + API Plugins)
The agent needs to interact with external tools — Playwright for browser automation, REST clients for API testing, Git for version control. The Model Context Protocol (MCP) provides a standardized way for LLMs to call external tools.
// MCP Server configuration for QA tools
{
  "mcpServers": {
    "playwright": {
      "command": "npx",
      "args": ["@anthropic/mcp-playwright"],
      "description": "Browser automation for E2E testing"
    },
    "github": {
      "command": "npx",
      "args": ["@anthropic/mcp-github"],
      "description": "PR creation, branch management"
    },
    "jira": {
      "command": "npx",
      "args": ["@anthropic/mcp-jira"],
      "description": "Ticket management and status updates"
    }
  }
}
Each tool plugin exposes capabilities that the LLM can invoke. Playwright provides page navigation, element interaction, screenshot capture, and network interception. The GitHub plugin provides branch creation, file writing, and PR management.
Layer 4: The Execution Layer (Test Framework Integration)
Generated tests need to run in your existing test framework. This layer translates the agent’s test specifications into executable Playwright test code, commits them to a branch, and triggers execution.
import { test, expect } from '@playwright/test';

test.describe('User Registration - JIRA-4521', () => {
  test('should register new user with valid email', async ({ page }) => {
    await page.goto('/register');
    await page.fill('[data-testid="email"]', 'test-' + Date.now() + '@example.com');
    await page.fill('[data-testid="password"]', 'SecureP@ss123!');
    await page.fill('[data-testid="confirm-password"]', 'SecureP@ss123!');
    await page.click('[data-testid="register-btn"]');

    await expect(page.locator('[data-testid="welcome-message"]'))
      .toBeVisible({ timeout: 10000 });
  });

  test('should reject registration with existing email', async ({ page }) => {
    await page.goto('/register');
    await page.fill('[data-testid="email"]', 'existing-user@example.com');
    await page.fill('[data-testid="password"]', 'SecureP@ss123!');
    await page.click('[data-testid="register-btn"]');

    await expect(page.locator('[data-testid="error-message"]'))
      .toContainText('already registered');
  });
});
Layer 5: The Analysis Layer (Result Interpretation)
After tests run, the agent interprets results — not just pass/fail, but why something failed. This layer analyzes test output, screenshots, console logs, and network traces to classify failures as genuine bugs, flaky tests, environment issues, or test code problems.
This is where AI agents provide the most value over traditional automation. A conventional test runner reports “element not found.” An AI agent analyzes the screenshot, checks the DOM, and reports “the submit button moved from the sidebar to a modal dialog after the latest design system update — selector needs updating, not a bug.”
Layer 6: The Action Layer (CI/CD Integration)
The final layer connects the agent to your CI/CD pipeline and project management tools. It creates PRs with generated tests, comments on Jira tickets with results, and triggers pipeline runs.
# GitHub Actions workflow triggered by QA Agent
name: AI Agent Test Suite
on:
  workflow_dispatch:
    inputs:
      jira_ticket:
        description: 'Jira ticket ID'
        required: true

jobs:
  generate-and-run:
    runs-on: ubuntu-latest
    steps:
      - uses: actions/checkout@v4
      - name: Run QA Agent
        run: |
          npx qa-agent generate --ticket ${{ github.event.inputs.jira_ticket }}
          npx playwright test tests/generated/
      - name: Report Results
        if: always()
        run: npx qa-agent report --ticket ${{ github.event.inputs.jira_ticket }}
🚀 Build Real AI Testing Skills
Stop testing AI by guesswork. Learn DeepEval, RAG evaluation, and agent testing with guided projects.
Building Your First Prototype in a Weekend
You do not need a massive infrastructure to build a working QA agent prototype. Here is the minimal viable stack.
Prerequisites: Node.js 18+, a Jira account with API access, an Anthropic or OpenAI API key, and a GitHub repository with an existing Playwright test suite.
Step 1: Set up the LangChain orchestration with your chosen LLM. Create a prompt template that takes Jira ticket data as input and outputs structured test specifications in JSON. Test this manually with 5-10 real tickets to calibrate the prompt.
Step 2: Build the Jira integration. Use the Jira REST API to fetch ticket details. Parse the description, acceptance criteria, and linked issues. Feed this structured data into your LangChain chain.
Step 3: Create a test code generator that transforms the LLM’s JSON test specs into actual Playwright test files. This is template-based — you define your team’s test patterns and the generator fills in specifics.
Step 4: Wire it into a GitHub Actions workflow. The agent creates a branch, commits generated test files, runs them, and creates a PR with results. Start with manual trigger before automating.
The Role Shift: QA Engineer to QA Agent Orchestrator
This architecture does not eliminate QA engineers. It changes what they do. Instead of writing individual test cases, you orchestrate the agent — defining test strategies, reviewing AI-generated coverage, handling edge cases the agent cannot reason about, and maintaining the agent’s knowledge base.
The skills that matter: prompt engineering, system design, domain expertise for validating test coverage, and quality judgment for knowing when to trust the agent and when to override it. This is actually an upgrade — you move from repetitive test writing to strategic quality thinking.
When to Use Agentic QA vs. Traditional Automation
Use agentic QA when: your application changes frequently and test maintenance is a burden, you have a large untested backlog, your team spends more time writing tests than analyzing results, or you need to scale test generation faster than you can hire.
Stick with traditional automation when: your application is stable, your existing suite provides adequate coverage, AI infrastructure cost exceeds the value, or your team lacks expertise to maintain an AI agent.
Use a hybrid approach when: you want agents to handle regression and smoke testing while humans focus on exploratory and edge-case testing. This is where most teams should start.
Honest Limitations of Current QA Agents
AI QA agents in 2026 are genuinely useful but far from perfect. Generated tests require human review. Agents struggle with complex business logic requiring domain expertise not present in tickets. They cannot replace exploratory testing. Infrastructure costs can be significant at scale. And the agent itself needs maintenance.
Anyone selling a “fully autonomous QA agent” in 2026 is overselling. The reality is semi-autonomous agents handling 60-70% of routine test generation while humans handle the rest. That is still enormously valuable — but set expectations accordingly.
Frequently Asked Questions
Which LLM is best for QA agent development?
Claude and GPT-4 both perform well. Claude tends to produce more structured, consistent output and handles long context well. GPT-4 has broader tool integration. For cost-sensitive deployments, Llama 3 running locally is viable for simpler tasks. Start with whichever API you already have access to.
How much does it cost to run a QA agent?
Generating tests for a typical Jira ticket costs roughly $0.05-0.15 per ticket with Claude Sonnet. For a team processing 50 tickets per sprint, that is $2.50-7.50 per sprint in API costs. Infrastructure adds to this, but those costs likely exist already.
Can I build this without LangChain?
Absolutely. LangChain provides convenient abstractions for prompt chaining and tool use, but you can build the same pipeline with direct API calls. For simpler agents, direct API integration is often cleaner. LangChain becomes more valuable as complexity grows.
References
- Libin Sebastian — AI Agents in QA (LinkedIn, 221 reactions)
- Anthropic — Model Context Protocol (MCP) Documentation
- LangChain — Official Documentation
- Playwright — Getting Started Guide
- Atlassian — Jira Automation Guide
- GitHub Actions — Official Documentation
- Ministry of Testing — AI Agents in Software Testing
- Martin Fowler — The Practical Test Pyramid
🎓 Become an AI-Powered QA Engineer
Join hundreds of SDETs mastering LLM, RAG, and agent testing. Lifetime access, hands-on labs, and a job-ready portfolio.