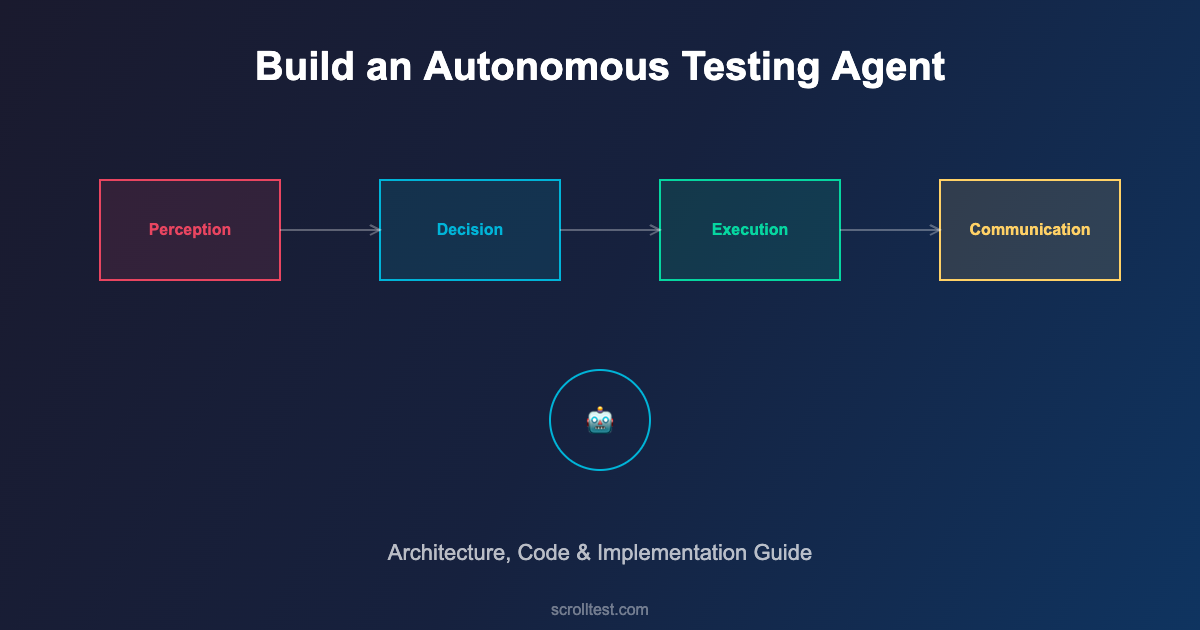
How to Build an Autonomous Testing Agent: Architecture, Code, and Implementation Guide
At 2:47 AM on a Tuesday, a deployment pipeline at a mid-size e-commerce company triggered its regression suite. 1,800 tests. Estimated runtime: 4 hours. The on-call engineer set an alarm for 7 AM to check results.
🤖 Learning AI-powered testing? Go hands-on with LLM, RAG, and AI-agent testing in the AI-Powered Testing Mastery course at The Testing Academy.
By 3:15 AM, an autonomous testing agent had already identified that 1,640 of those tests were irrelevant to the code change — a minor update to the product recommendation engine. It ran the 160 relevant tests in 12 minutes. Found two failures. One was a legitimate bug: the recommendation API was returning duplicate products when the user’s cart contained items from the same category. The other was a flaky test that had failed intermittently for three weeks.
The agent filed a bug report for the duplicate issue, tagged it with the affected code commit, attached the API response diff, and added it to the sprint board. It also flagged the flaky test with its failure history and recommended quarantine.
When the engineer woke up at 7 AM, there was nothing to check. The work was done.
This is what building an autonomous testing agent looks like in practice.
Contents
What Is an Autonomous Testing Agent?
An autonomous testing agent is a software system that combines test execution capabilities with AI-driven decision making. Unlike traditional test runners that execute a predefined list of tests, an autonomous agent makes decisions: what to test, when to test it, how deeply to test, and what to do with the results.
The “autonomous” part means the agent operates with minimal human intervention during the testing cycle. It receives a trigger (code change, deployment, scheduled run), analyzes the context, executes the appropriate tests, interprets results, and takes action — all without a human pressing buttons.
The “agent” part means it has goals, strategies, and the ability to adapt. It’s not just running scripts. It’s making decisions about how to achieve the goal of “verify this change doesn’t break anything” in the most efficient way possible.
Architecture of an Autonomous Testing Agent
Building an autonomous testing agent requires four core components working together: the Perception Layer, the Decision Engine, the Execution Layer, and the Communication Layer.
The Perception Layer
This is how the agent understands what’s happening. It monitors code repositories for changes, reads commit messages and PR descriptions, analyzes code diffs to understand which modules are affected, and pulls context from CI/CD pipeline metadata.
class PerceptionLayer:
    def __init__(self, repo_url, ci_config):
        self.repo = GitRepository(repo_url)
        self.ci = CIProvider(ci_config)
        self.change_analyzer = ChangeAnalyzer()

    def perceive(self, trigger_event):
        """Gather context about what changed and why"""
        commit = self.repo.get_commit(trigger_event.commit_sha)
        diff = self.repo.get_diff(commit)

        return {
            'changed_files': diff.files,
            'changed_modules': self.change_analyzer.identify_modules(diff),
            'change_type': self.change_analyzer.classify(commit.message),
            'risk_areas': self.change_analyzer.assess_risk(diff),
            'author': commit.author,
            'branch': trigger_event.branch,
            'pr_context': self.repo.get_pr_context(commit)
        }
The Decision Engine
This is the brain. Given the perception data, the decision engine determines the optimal testing strategy. It considers which tests map to the changed modules, the historical reliability of each test, the risk profile of the change, time and resource constraints, and previous failure patterns for similar changes.
class DecisionEngine:
    def __init__(self, test_registry, history_db):
        self.registry = test_registry
        self.history = history_db
        self.risk_model = RiskModel(history_db)

    def decide(self, perception_data):
        """Determine optimal test strategy"""
        # Map changes to affected tests
        affected_tests = self.registry.get_tests_for_modules(
            perception_data['changed_modules']
        )

        # Score each test by relevance and reliability
        scored_tests = []
        for test in affected_tests:
            relevance = self._calculate_relevance(test, perception_data)
            reliability = self.history.get_reliability(test.id)
            priority = relevance * reliability
            scored_tests.append((test, priority))

        # Sort by priority, filter unreliable tests
        scored_tests.sort(key=lambda x: x[1], reverse=True)

        # Determine execution plan
        return TestPlan(
            critical=[(t, s) for t, s in scored_tests if s > 0.8],
            standard=[(t, s) for t, s in scored_tests if 0.4 < s <= 0.8],
            optional=[(t, s) for t, s in scored_tests if s <= 0.4],
            quarantined=self.history.get_flaky_tests()
        )
The Execution Layer
This runs the actual tests. But unlike a simple test runner, the execution layer is adaptive. It runs critical tests first and can stop early if catastrophic failures are detected. It parallelizes execution intelligently based on available resources. It captures rich diagnostic data — logs, screenshots, network traces, performance metrics — not just pass/fail results.
The execution layer also handles retries intelligently. Instead of blindly retrying failed tests three times (the common anti-pattern), it analyzes the failure mode. Infrastructure failure? Retry. Assertion failure? Don't retry — it's a real bug. Timeout? Check resource utilization, then decide.
The Communication Layer
Results are useless if nobody acts on them. The communication layer translates test results into actionable information for different audiences. For developers, it posts inline comments on PRs showing exactly which tests failed and why. For QA leads, it generates summary dashboards with trends. For product managers, it provides release confidence scores.
class CommunicationLayer:
    def __init__(self, integrations):
        self.slack = integrations.get('slack')
        self.github = integrations.get('github')
        self.jira = integrations.get('jira')
        self.dashboard = integrations.get('dashboard')

    def report(self, test_results, perception_data):
        """Communicate results to appropriate channels"""
        summary = self._generate_summary(test_results)

        # Post PR comment with inline failure details
        if perception_data.get('pr_context'):
            self.github.post_pr_comment(
                pr=perception_data['pr_context'],
                summary=summary,
                failures=test_results.failures,
                confidence_score=summary.confidence
            )

        # File bugs for new failures
        for failure in test_results.new_failures:
            self.jira.create_bug(
                title=f"Test Failure: {failure.test_name}",
                description=failure.diagnostic_report,
                labels=['auto-detected', failure.severity],
                assignee=perception_data['author']
            )

        # Alert on critical failures
        if summary.confidence < 0.6:
            self.slack.send_alert(
                channel='#qa-alerts',
                message=f"⚠️ Low confidence ({summary.confidence:.0%}) "
                        f"for commit {perception_data['commit_sha'][:8]}"
            )
Building Your First Autonomous Agent: A Step-by-Step Guide
Step 1: Create the Test Registry
Before the agent can make intelligent decisions, it needs to know what tests exist and what they cover. Create a mapping between your test files and the application modules they test. This can be as simple as a JSON configuration file.
{
  "test_registry": {
    "tests/api/test_payments.py": {
      "module": "payment",
      "type": "api",
      "critical": true,
      "avg_duration_seconds": 45,
      "tags": ["payment", "checkout", "refund"]
    },
    "tests/ui/test_checkout_flow.py": {
      "module": "checkout",
      "type": "ui",
      "critical": true,
      "avg_duration_seconds": 120,
      "tags": ["checkout", "cart", "payment"]
    },
    "tests/api/test_recommendations.py": {
      "module": "recommendations",
      "type": "api",
      "critical": false,
      "avg_duration_seconds": 30,
      "tags": ["recommendations", "products", "ml"]
    }
  }
}
Step 2: Build the Change Analyzer
The change analyzer reads git diffs and maps them to modules. Start simple: use file path patterns to identify which modules changed. A change in src/payment/processor.py maps to the "payment" module. Over time, you can add more sophisticated analysis like dependency graph traversal.
Step 3: Implement the Decision Logic
Start with a rule-based approach: if module X changed, run tests tagged with X. Add smoke tests to every run. Exclude known flaky tests. As you collect data, introduce ML-based prioritization that learns from historical failure patterns.
🚀 Build Real AI Testing Skills
Stop testing AI by guesswork. Learn DeepEval, RAG evaluation, and agent testing with guided projects.
Step 4: Wire Up Communication
Integrate with your existing tools. Post results to Slack. Comment on PRs. Update your dashboard. The agent is only as useful as its ability to communicate what it found to the people who need to act on it.
Common Pitfalls and How to Avoid Them
Over-automation: Don't try to automate everything in the first iteration. Start with test selection and communication. Add self-healing and AI-generated tests later. Complexity kills projects.
Ignoring flaky tests: Flaky tests poison autonomous agents. The agent can't distinguish between a real failure and a flaky failure without historical data. Build flaky test detection and quarantine from day one.
No human oversight: "Autonomous" doesn't mean "unsupervised." Humans should review the agent's decisions weekly. Are the right tests being selected? Are bugs being accurately categorized? Is the confidence score calibrated?
Poor test registry maintenance: The agent is only as good as its test registry. When new tests are added or modules are restructured, the registry must be updated. Make registry updates part of your PR review checklist.
Tools and Technologies
Test Execution: Playwright, Selenium Grid, pytest, JUnit 5 — the agent orchestrates these, it doesn't replace them.
CI/CD Integration: GitHub Actions, Jenkins, GitLab CI — the agent hooks into pipeline events as triggers.
Decision Making: Python with scikit-learn for ML-based prioritization, or start with rule-based logic in any language.
Communication: Slack API, GitHub API, Jira REST API, custom dashboards with Grafana or similar.
LLM Integration: OpenAI API or local models for test generation, failure analysis, and natural language bug reports.
Frequently Asked Questions
How is this different from just running tests in CI/CD?
CI/CD runs a predefined list of tests on every trigger. An autonomous agent analyzes what changed, selects the most relevant tests, executes them with intelligent retry logic, and communicates results with context. It's the difference between a playlist and a DJ.
What size team needs this?
Any team with more than 500 tests and regular deployments benefits. Smaller teams benefit from the communication layer alone — automated bug filing and PR comments save significant time even without intelligent test selection.
Can I build this with open-source tools?
Yes. The entire architecture can be built with Python, pytest, GitHub Actions, and free tier APIs. The decision engine is custom code. The perception layer uses git commands. The execution layer wraps existing test runners. No proprietary tools required.
How do I measure success?
Track four metrics: feedback time (how quickly developers get test results), test relevance ratio (percentage of executed tests that are relevant to the change), false negative rate (bugs the agent missed), and developer satisfaction (do they trust the agent's results?).
The Bottom Line
An autonomous testing agent isn't science fiction. It's an engineering project with well-defined components: perception, decision, execution, and communication. Each component can be built incrementally, tested independently, and improved over time.
The on-call engineer who set an alarm for 7 AM? With an autonomous agent, that alarm is unnecessary. The agent handles the routine intelligence work — selecting tests, running them, interpreting results, filing bugs — so engineers can focus on the creative work: designing test strategies, exploring edge cases, and building quality into the product.
Start with the test registry and change analyzer. Add intelligent selection. Wire up communication. You'll have a working autonomous agent within a month, and it'll save your team hours every week from day one.
References
- Playwright Documentation — Browser automation framework with built-in intelligence
- pytest Documentation — Python test framework with powerful plugin architecture
- GitHub Actions — CI/CD platform for pipeline integration
- scikit-learn — Machine learning for test prioritization models
- Martin Fowler — The Practical Test Pyramid — Test strategy fundamentals
- Slack API — Communication integration for alerts and reporting
- GitHub REST API — PR comments and repository integration
- Grafana — Dashboard and visualization for test metrics
- Google Testing Blog — Industry perspectives on test infrastructure
- Ministry of Testing — QA community and automation resources
🎓 Become an AI-Powered QA Engineer
Join hundreds of SDETs mastering LLM, RAG, and agent testing. Lifetime access, hands-on labs, and a job-ready portfolio.